

Introduction
In order to see more about what it can do (and has done for my Washburn family), check out this video that is essentially a brief version of my part of my RootsTech presentation with Penney Devey. My company made into a video to promote these family websites, which we offer to those who don’t want to follow this guide and build a family website themselves:
Benefits
- Very easy to use – just type your message, and click post.
- Private & secure – only your family (those you approve) will be able to see information shared.
- Live messaging – posts and comments live update on any screen that is viewing the page.
- Email notifications – each user is notified once per day of all new posts, and of any comments on a post they have made. Also, anyone can subscribe to email notifications of new comments on any post.
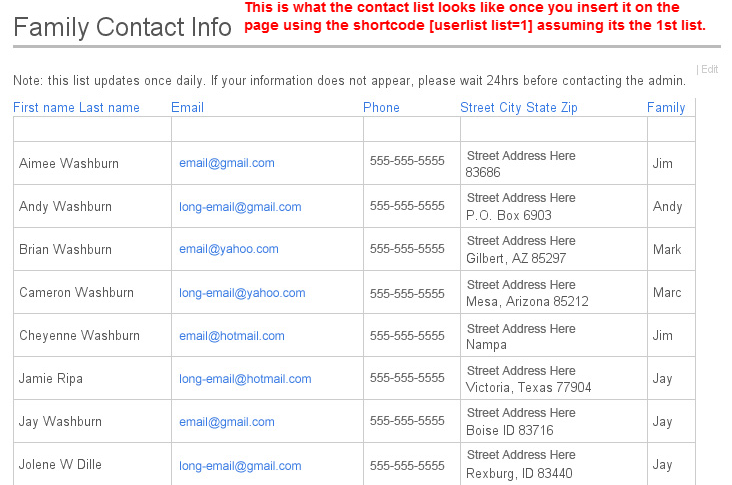
- Automatic contact list – each family member puts in their email, phone number, and address, this is shared on an automatically updated family contact list (great for wedding/baby announcements).
A Few Notes
- There is nothing inherently “Mormon” about this website. It’s great for any family that’s spread out. So if you’re not LDS, a site like this can really be awesome for your family as well. Also, if you’re from another blog or site that would like to share/link to this, don’t hesitate, this guide is great for all families.
- This is going to be the short guide with screenshots of most of my settings, etc., rather than explanations of why I did what I did. So my suggestion is to mimic everything, and then play around with settings if you think you want things different. Also, some screenshots may not show all plugin settings. The ones I cut off are left on their defaults.
- This is a somewhat technical process as we’ll be setting up WordPress, but with no programming (or CSS/HTML editing) required.
- There is a little cost involved as you’ll need hosting (a WordPress.com blog will not work as they don’t let you install plugins) and to register a domain for the website’s address.
1. Getting Started
To start out, you’ll need to get hosting and a domain name, if you don’t already have one. I opted for WashburnFam.com for my Washburn family, and my Mother chose IvanPearceFamily.com for one we’ve just completed for her side of the family. If you don’t know how to setup hosting and register a domain, it’s not too hard. I recommend using Hostmonster, Bluehost, or Hostgator, as all are quite cheap ($5-7/month), but reliable and with great customer service. Each of these will have you register a domain as part of setting up your hosting. The next step is to setup WordPress. This video tutorial from my Start WordPress class will walk you through both getting your hosting, as well as setting up WordPress on your hosting:
2. Standard Settings

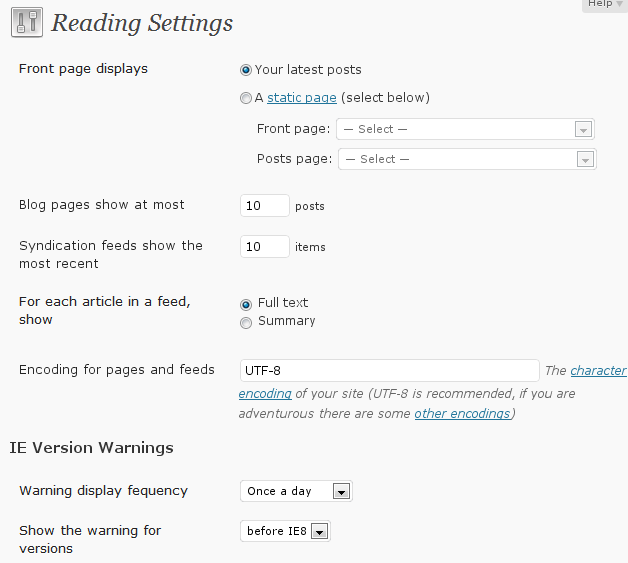
The last category in the left-sidebar is “Settings.” Under General, you’ll want to put in the title of your site (eg. “J B & Barbara Washburn family website”), and the tagline (perhaps something like “All descendants of _____”). You’ll also need to check the option “Anyone can register” to allow people to register. Other than that you can set Timezone and other settings, but they aren’t so important. Most of the rest of the settings pages (eg. “Writting”, “Reading”, etc.) can be left with their defaults. See screenshots of each below, to see how I set them.
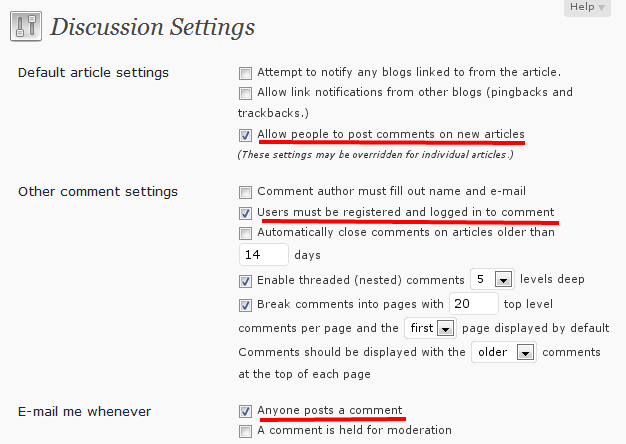
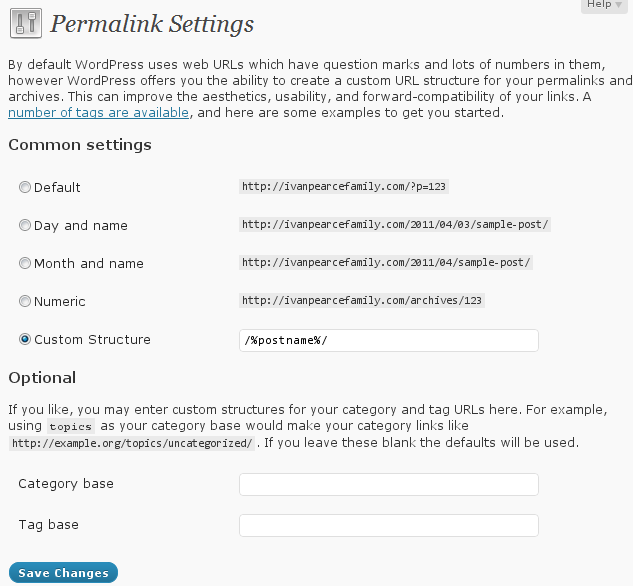
The one exception is you’ll want to make sure an mimmic my settings for the Discussion page. There are a couple of settings there that affect some things we will do later in this guide. Particularly “Users must be registered and logged in to comment” & “Anyone posts a comment.” The 2nd setting only applies to that author of a post, so don’t worry, you won’t get tons of emails. Also, you need to set a permalink structure, other than the default one, or some functions won’t work correctly.
3. Theme
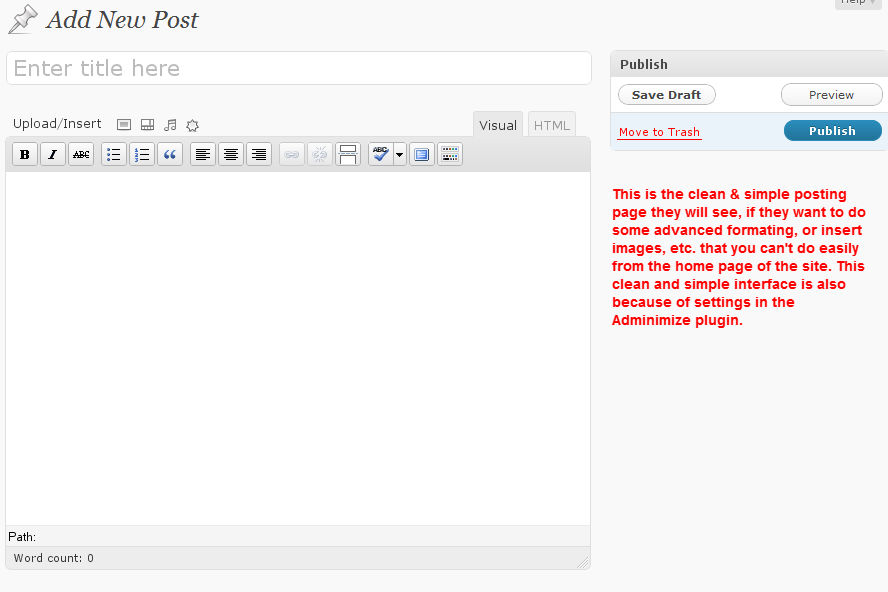
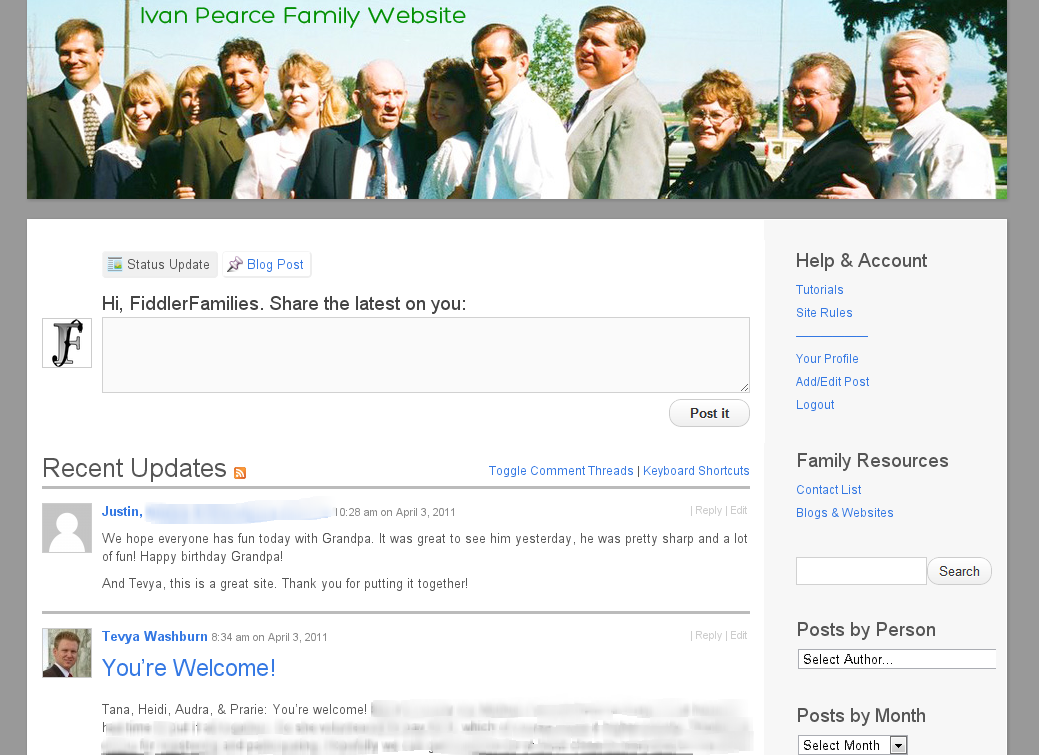
Now go to Appearance>Themes. Then click the large tab that says “Install Themes” and search for “P2.” This is an excellent theme that gives the site a lot of its powers: simple posting right from the front page, live updates of posts and comments, and several other great features. Once you’ve found it click “Install” then once it’s installed “Activate.” This will apply that theme to your website. If you click the title of your site at the top, you’ll see it looks very different than it did before.
The easiest way to customize the theme is simply use the “Header” & “Background” settings pages under Appearance, to upload a custom background and header image, as well as customize the text of the header. I wanted to customize things even further, so I created a custom child-theme that made the site a whole lot simpler, and added some powerful features. If you would like to mimic what I did, you’ll want to download (.zip file) the child-theme I created. Then go to Appearance>Themes, then click the “Install Themes” tab, and then the small “Upload” link. Just click the “Choose file” button and select the .zip file from wherever you downloaded it to. Then go back to the “Manage Themes” tab and activate it there. This is a child-theme of P2, which means it’s dependent on P2, so don’t go deleting P2. It also means to can modify it’s files under Appearance>Editor and you won’t lose those changes if you ever need to update the P2 theme.
For the advanced user only, here’s the changes I made: in the style.css file I made several minor changes to the layout of the page, increased the height of the header to 200px (for a slightly taller header image), hid a bunch of things like the options to post a link & quote, plus all the tags, and media buttons. I hid the media buttons on the home page because as of this version of WP/P2 the “Insert media” doesn’t fully work right there. Users can still do a regular post to insert images.
In the functions.php file I removed the message that tells new users they need to change their password—because they’ll set it when they register, made it so the site will use each person’s first and last name as their display name, increased the height of the header to 200px (must do it in both files to work right), and made it so there are only 3 sizes of image with no full-size image so as not to waste bandwidth on large pictures.
4. Plugins
One of the best features of WordPress is that there are tons of freely available plugins. These modify WordPress and allow it to do tons of things (almost anything you’d want a standard website to do, and more). If you go to Plugins>Add New you can just search the title of each of these, and add them to your site. Here’s the plugins I installed with what they do for the site. See the images below for settings on each one (there’s a reason for most settings).
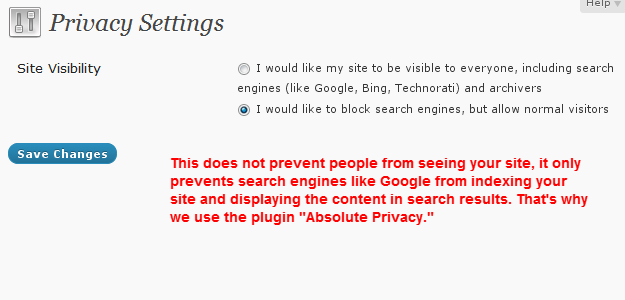
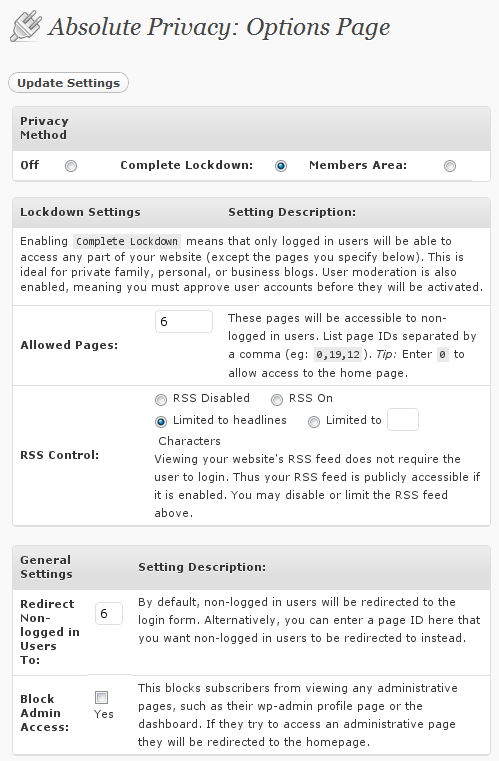
- Absolute Privacy – use this plugin to lock up your blog, so only those you approve can view and post. I also set it to allow the title of all posts to be public via the RSS feed. This way those who would prefer to subscribe via RSS, can do so, but without any content being public.
- Adminimize – use this to make the WordPress admin interface really simple. I hid almost everything for the Subscriber-level users, except their Profile page so they can update their contact info and the Posts page, so they can do a more advanced post. But even within that, I simplified the posting area a ton, so its simple and easy to use. Download my settings here, use the Import section near the bottom of the plugin’s settings to duplicate them from that file.
- amr users – this plugin is what take the info from people’s profiles, and creates the automatic family contact list.

- Author’s Widget – just a widget for the sidebar that displays a drop-down list of all users, so you can view just their posts. See the widget on the widgets screenshot for settings.
- Avatars – allows users to upload their own Avatar (WordPress uses something called Gravatar’s by default), or will use their Twitter avatar if a twitter username is supplied. I had to modify this one slightly to get it to work (just a minor correction in the code for most hosts). Download my modified version here.
- Gecka IE Warning – I found that the image galleries got lined up in one long column for users using Internet Explorer 7 or earlier. This detects when they’re using one of those, and encourages them to upgrade to a more modern browser. Options for this plugin are on the Settings>Reading page, and are in that screenshot.
- Register Plus Redux – this plugin allows you to add all the extra fields to the registration form, and user profile, like phone number and address, so that you can use that info for the auto-updated family contact list. Mimic these settings exactly, because it can conflict with Absolute Privacy, and cause problems.
- Secure WordPress – just a security plugin for added security. Use the default settings.
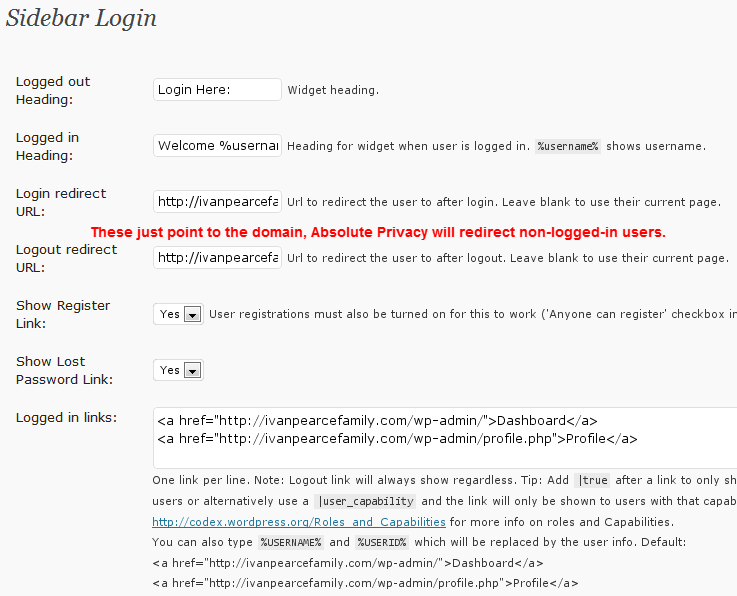
- Sidebar Login – I wanted to display a page that encourages family to register, and non-family to get their own website. So I used this to put the login area on the sidebar of that page as well as to redirect people to the front page of the site, rather than the admin area, as is the default.
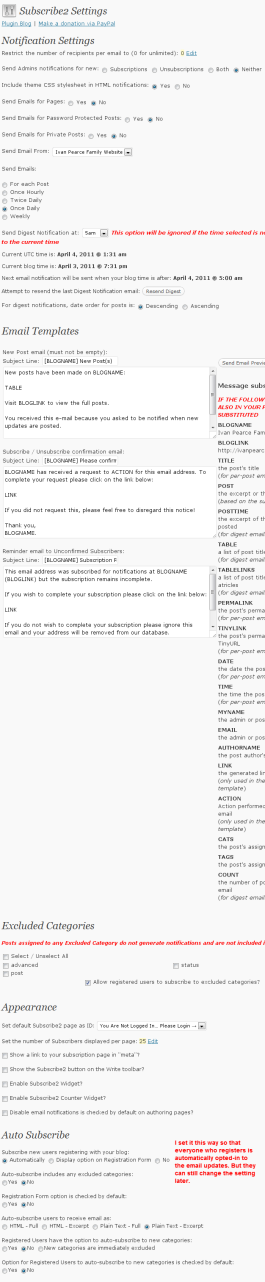
- Subscribe2 – this is the plugin that sends out a daily digest email, with the titles of all posts made that day, to all users of the site (unless they opt-out).
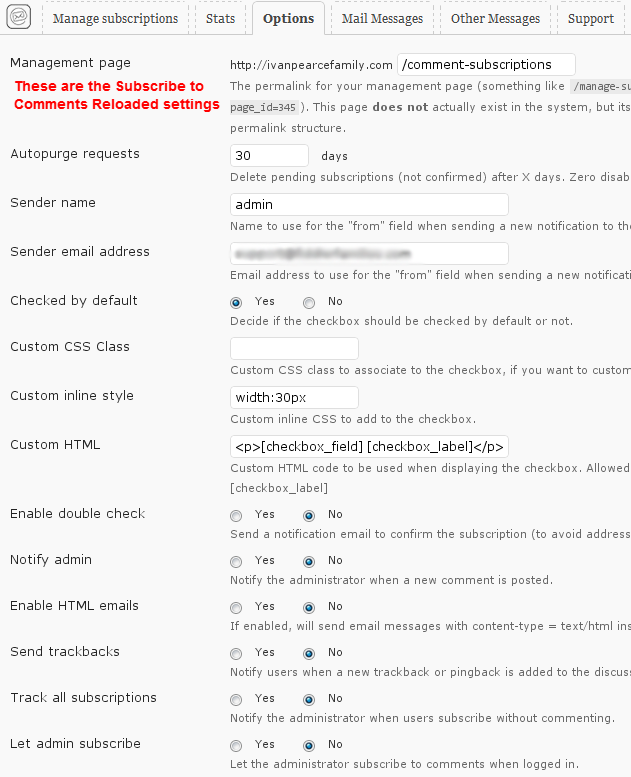
- Subscribe to Comments Reloaded – this is what allows people to get an email notification when somebody replies to a post they are subscribed to.
- User Role Editor – it’s probably possible to do all this without this, but previously you couldn’t set the default role for a new person who registered. So since Subscriber is the default, I used this to give the Subscriber role some extra privileges so they could post and add pictures, etc.
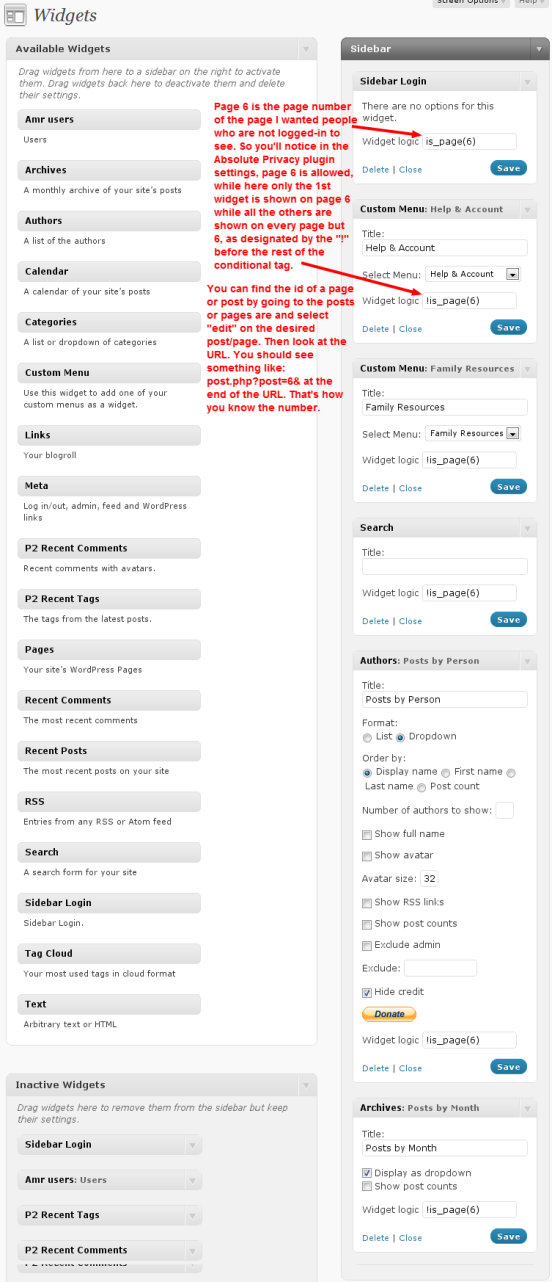
- Widget Logic – by default all widgets display on all pages/posts in WordPress. This allows you to specify specific pages or posts you want a widget to appear on, or not appear on. I used this to make the widget created by the Sidebar Login plugin display on the “not logged in” page, but not on any others. It just ads a little space on the bottom of widgets, see the Widgets screenshots for settings.
- WordPress.com Stats – (not necessary, just for stats on the site) very easy to setup analytics plugin. You’ll just need to get a WordPress.com account.
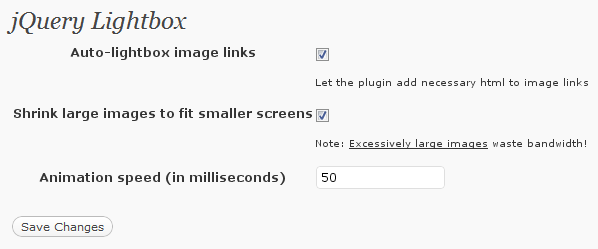
- wp-jquery-lightbox – this plugin creates nice lightboxes on all larger image links. So all display nicely, and you can just click through all images in a post. See this post for more info.

5. Pages
Once again, there’s a screenshot of the pages I’ve created. I created them each, un-checking the option for comments on them. The “not logged-in” page just basically says you’re not logged-in and that you need to register or login if you’re family. The site rules, just lists the rules. “How to Use This Site” has some videos I posted on YouTube that show people how to use the site (I’ll create some updated ones you can all link to in the near future). “Family Contact Info” and “Family Blogs & Websites” each just has a shortcode in them, telling that page to display the user lists created by the amr users plugin.
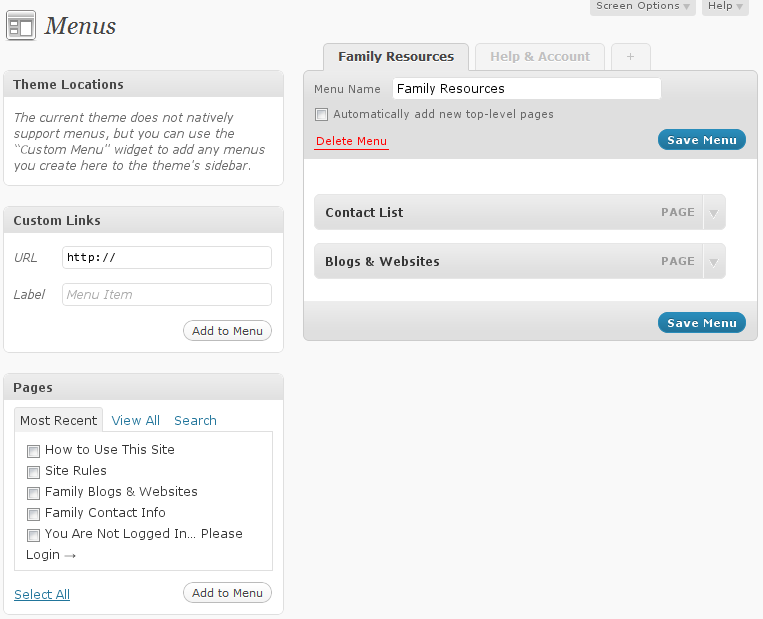
6. Menus & Widgets
I used the Appearance>Menus feature to create 2 menus that I then placed in the sidebar, via widgets. I also did several other widgets so people could search, sort by author, etc. The Widget Logic plugin came in handy, allowing me to display the login widget only on the page that non-logged-in users see (Absolute Privacy settings control this), and not show any of the other widgets on that page. See the screenshot for all settings.
7. Test & Invite
Spend some time testing, once you’ve got it all setup to make sure it works right. You’ll probably even want to register (I found it helpful to do it in a different browser than my primary, so I could stay logged in) as if you were a new user, and make sure everything works correctly, and that from that new login, you only see/access the stuff in the admin area that you’re supposed to see/access. After testing it thoroughly to make sure every thing is working, send out an invitation for people in your family (or whatever group you choose) to come join. Our experience is that people are excited and many will join quickly and start posting and communicating right away.
Here’s all the screenshots for WordPress settings, plugin settings, etc.


Final Notes
I may have missed something, so if you go through all this and things aren’t working, tell me what in the comments and I’ll try to help correct it. As updates for these plugins, the P2 theme, and even WordPress itself come out, things may break (if you update or use the latest versions). So I can only guarantee that it all works and works well, with the current version of every thing, as of today 7th April 2011. Older versions are always available, so based on that date you can figure out which to get, if you’re reading this down the road.
Also remember, if this all sounds way to complicated and/or time consuming, you can always sign up for a family site just like this (maybe even a little better), and my team will take care of all this hassle and effort. You just need to send the invites, and approve people as they register. Then sit back and enjoy keeping in-touch with all your family.
Looking back, it looks like a beast, but isn’t really too bad if you just do it in a systematic way, following the guide and screenshots. I’d love to hear about how it turned out for you, and of course any issues I can help with. Just let me know in the comments below.


